

 SEOGUN
Picker 와 Section에 대해 알아보도록 합시다.
Picker
selection binding, label, content를 표시할 내용을 제공하여 Picker를 만듭니다. selection parameter를 현재 selection으로 표시할 값을 제공하는 바인딩된 속성으로 설정합니다. 레이블을 선택 도구에서 내용 선택 목적을 시각적으로 설명하는 보기로 설정한 다음 선택 도구에서 표시할 내용을 제공합니다.
ForEach
간단하게 Picker와 ForEach를 사용하여 목록을 선택할 수 있는 피커 화면을 구성할 수 있습니다.
struct ContentView: View {
    //학생 목록을 만들고
    let students = ["서근", "희진", "미진", "슬기"]

    //State으로 값이 수정되도 인식되게 만든다
    @State private var selectedStudent = ""

    var body: some View {

        Picker("selected student", selection: $selectedStudent) {
            ForEach(0 ..< students.count) {
                Text(self.students[$0])
            }
        }
    }
}

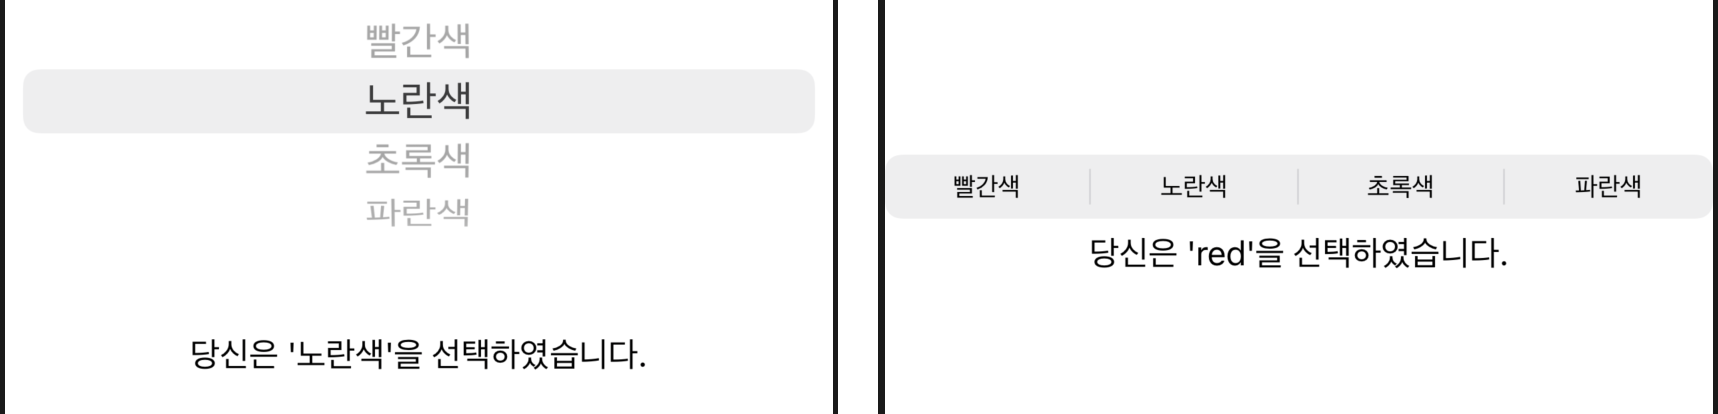
피커가 선택될 때마다 어느 색이 선택되었는지 아래에 텍스로 표현해 줄 수 있습니다.
struct ContentView: View {

   var colors = ["빨간색", "노란색", "초록색", "파란색"]
    @State private var selectedColor = "빨간색"

    var body: some View {
        VStack {
            Picker("원하는 색을 골라주세요", selection: $selectedColor) {
                ForEach(colors, id: \.self) {
                    Text($0)
                }
            }
            Text("당신은 '\(selectedColor)'을 선택하였습니다.")
        }
    }
}
위 코드와 동일한 방법으로 아래와 같이 작성할 수 도 있습니다. 결과는 같습니다.
struct ContentView: View {

   var colors = ["빨간색", "노란색", "초록색", "파란색"]
    @State private var selectedColor = 0

    var body: some View {
        VStack {
            Picker("원하는 색을 골라주세요", selection: $selectedColor) {
                ForEach(0 ..< colors.count) {
                    Text(self.colors[$0])
                }
            }
            Text("당신은 '\(colors[selectedColor])' 를 선택하였습니다. ")
        }
    }
}
Enum
Enum을 사용하여 Picker가 될때마다 텍스트 값이 자동으로 선택된 텍스트로 수정되는 방법도 있습니다.
import SwiftUI

enum Flavor: String, CaseIterable, Identifiable {
    case 초콜릿
    case 바닐라
    case 딸기

    var id: String { self.rawValue }
}

struct ContentView: View {
    @State private var selectedFlavor = Flavor.초콜릿
    var body: some View {

        VStack {
            Picker("Flavor", selection: $selectedFlavor) {
                Text("초콜릿").tag(Flavor.초콜릿)
                Text("바닐라").tag(Flavor.바닐라)
                Text("딸기").tag(Flavor.딸기)
            }
            Text("선택한 시럽 : \(selectedFlavor.rawValue) 시럽")
        }
    }
}

Picker Style
Picker 에는 다양한 스타일 옵션이 있습니다.
DefaultPickerStyle- 선택기의 context를 기반으로 하는 기본 선택기 스타일입니다.WheelPickerStyle- 스크롤 가능한 휠에 옵션을 표시하는 선택기 스타일입니다.SegmentedPickerStyle- 세그먼트화 된 컨트롤에서 옵션을 제공하는 선택기 스타일입니다.PopUpButtonPickerStyle- (더 이상 사용되지 않음)
struct ContentView: View {

   var colors = ["빨간색", "노란색", "초록색", "파란색"]
    @State private var selectedColor = 0

    var body: some View {
        VStack {
            Picker("원하는 색을 골라주세요", selection: $selectedColor) {
                ForEach(0 ..< colors.count) {
                    Text(self.colors[$0])
                }
            }
            Text("당신은 '\(colors[selectedColor])' 를 선택하였습니다. ")
        }
        .pickerStyle(SegmentedPickerStyle())
    }
}
tipPercentage 를 추가하여 퍼센트를 나타내 주는 화면을 구상해보도록 하겠습니다.
struct ContentView: View {

    @State private var tipPercentage = 0

    //퍼센트 단위를 배열로 만들어주고
    let tipPercentages = [10, 15, 20, 25 , 0]

    var body: some View {
        NavigationView {
            Form {
               //퍼센트 섹션
                Section {
                    Picker("tip Perentage", selection: $tipPercentage) {
                        //0..< = 딕셔너리의 [10]부터 tipPercentage보다 작은값
                        ForEach(0 ..< tipPercentages.count) {
                            Text("\(self.tipPercentages[$0])%")
                        }
                    }
                }
            }
            .navigationTitle("WeSplit")
        }
    }
}
이렇게 코드를 작성하면 아래와 같은 결과 화면을 만들 수 있습니다.

여기서 Segmented control 을 사용하면 더 직관적으로 볼 수 있게 됩니다. 우선 Picker 코드 아래에 다음 코드를 추가해줍니다. 그리고 section 아래에 Text를 추가하여 섹션 부분에도 제목을 지정해 주겠습니다.
.pickerStyle(SegmentedPickerStyle()) var body: some View {
NavigationView {
Form {
//퍼센트 섹션
Section {
//섹션 부분에 텍스트
Text("How much tip do you want leave?")
Picker("tip Perentage", selection: $tipPercentage) {
//0..< = 딕셔너리의 [10]부터 tipPercentage보다 작은값
ForEach(0 ..< tipPercentages.count) {
Text("\(self.tipPercentages[$0])%")
}
}
}
.pickerStyle(SegmentedPickerStyle())
}
.navigationTitle("WeSplit")
}섹션 부분에 Text를 추가해줘도 되지만 여러 가지 옵션이 있습니다. 밑 결괏값을 보며 비교해주시면 어느 것이 더 실용적인지 알 수 있습니다.
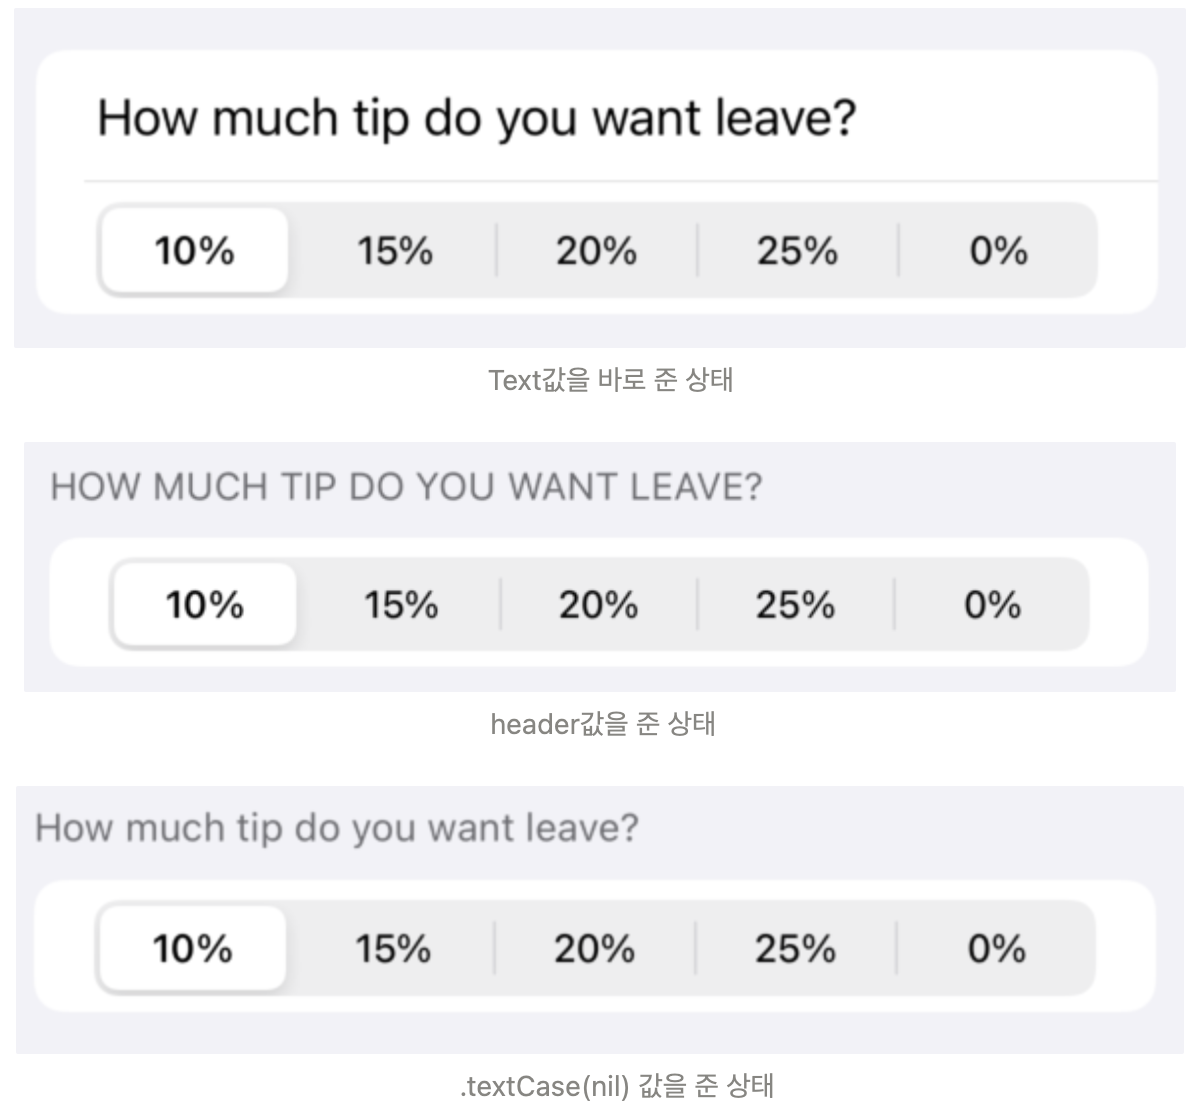
이것을 사용하기 위해선 Section 뒤에 header값을 추가해주면 가능합니다.
Section(header: Text("How much tip do you want leave"))위 스크린샷에서 확인했듯이, header 값만 주면 전체가 다 대문자로 표시되게 되는데, 이를 수정하려면 Section이 끝나는 아래쪽에 textCase(nil)을 넣어주면 됩니다. 아래 전체 코드로 확인해보세요 :)
전체 코드
<hide/>

struct ContentView: View {
    @State private var checkAmound = ""
    @State private var numberOfPeople = 0
    @State private var tipPercentage = 0

    //퍼센트 단위를 배열로 만들어주고
    let tipPercentages = [10, 15, 20, 25 , 0]

    var body: some View {
        NavigationView {
            Form {
               //텍스트필드 섹션
               Section {
                    TextField("Amount", text: $checkAmound)
                        .keyboardType(.decimalPad)

                    //피커 섹션
                    Picker("number of people", selection: $numberOfPeople) {
                        ForEach(0 ..< 100) {
                            Text("\($0) people")
                        }
                    }
                }
                //퍼센트 섹션
                Section(header: Text("How much tip do you want leave")) {
                    Picker("tip Perentage", selection: $tipPercentage) {

                        //0..< = 딕셔너리의 [10]부터 tipPercentage보다 작은값
                        ForEach(0 ..< tipPercentages.count) {
                            Text("\(self.tipPercentages[$0])%")
                        }
                    }
                }
                .pickerStyle(SegmentedPickerStyle())
                .textCase(nil)

                Section {
                    Text("$ \(checkAmound)")
                }
            }
            .navigationTitle("WeSplit")
        }
    }
}
UISegmentedControl
.pickerStyle(SegmentedPickerStyle())을 사용할때 UIKit의 UISegmentedControl을 사용하여 픽커의 배경색과 폰트의 색상을 변경해줄 수 있습니다.
picker의 배경색을 정해주는 코드입니다,
init() {
        UISegmentedControl.appearance().selectedSegmentTintColor = UIColor.gray
        }
만약 폰트색상을 변경하고 싶다면 아래와 같이 코드를 작성 할 수 있습니다.
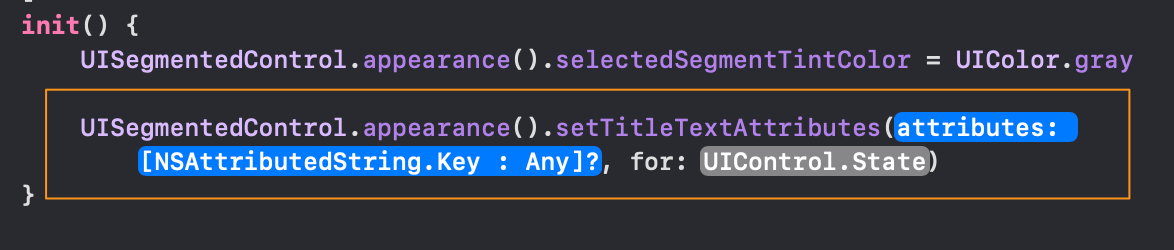
자동완성된 코드를 보시면 attributes이라는 코드가 있는데 이것을 let상수로 따로 만들어주겠습니다.
        let attributes: [NSAttributedString.Key:Any] = [
           //원하는 색상
            .foregroundColor : UIColor.white
        ]
이제 아래 코드를 다음과 같이 수정해줍니다.
    init() {
        UISegmentedControl.appearance().selectedSegmentTintColor = UIColor.gray

        let attributes: [NSAttributedString.Key:Any] = [
           //원하는 색상
            .foregroundColor : UIColor.white
        ]
        UISegmentedControl.appearance().setTitleTextAttributes(attributes, for: .selected)
    }
전체코드를 작성해서 확인해보도록 하겠습니다.
import SwiftUI

struct PickerView: View {

    @State var selection: String = "냉동식품"
    let filterOptions: [String] = [
        "과일", "생선", "고기", "냉동식품"
    ]
    init() {
        UISegmentedControl.appearance().selectedSegmentTintColor = UIColor.gray

        let attributes: [NSAttributedString.Key:Any] = [
           //원하는 색상
            .foregroundColor : UIColor.white
        ]
        UISegmentedControl.appearance().setTitleTextAttributes(attributes, for: .selected)
    }

    var body: some View {

        Picker(selection: $selection,
               label: Text("picker"),
               content: {
                ForEach(filterOptions.indices) { index in
                    Text(filterOptions[index])
                        .tag(filterOptions[index])
                }
        })
            .pickerStyle(SegmentedPickerStyle())

    }
}

읽어주셔서 감사합니다🤟
본 게시글의 전체코드 GitHub 👇🏻
Seogun95/SwfitUI_Picker-ForEach-Section_TUT
Picker,ForEach,Section에 대해 알아봅시다. Contribute to Seogun95/SwfitUI_Picker-ForEach-Section_TUT development by creating an account on GitHub.
github.com
'SWIFTUI > View layout' 카테고리의 다른 글
| SwiftUI : Material - background blur 효과 (0) | 2022.03.04 |
|---|---|
| SwiftUI : Sheet / FullScreenCover (@Environment / presentationMode) (0) | 2021.05.11 |
| SwiftUI : Lazy V(H)Grid (4) | 2021.05.08 |
| SwiftUI : ScrollView (1) | 2021.05.08 |
| SwiftUI : Form (Toggle / disabled / If ) (0) | 2021.03.19 |


 한국어 (기본)
 English
 Русский
 日本語
日本語
