

 SEOGUN
TapGesture 에 대해 알아보도록 합시다.
모든 SwiftUI view에는 Gesture 인식기가 연결될 수 있으며 이러한 Gesture인식기는 인식기가 활성화될 때 실행될 클로저를 차례로 연결할 수 있습니다.
TapGesture
이것을 만들 때 제스처를 트리거하는 데 걸리는 탭 수를 지정한 다음, 제스처가 발생할 때 실행될 onEnded 클로저를 연결할 수 있습니다. 예를 들어 택할 때마다 작아지는 이미지를 만들어 보겠습니다.
struct ContentView: View {
    @State private var scale: CGFloat = 1.0

    var body: some View {
        Image("seogun")
            .scaleEffect(scale)
            .gesture(
                TapGesture()
                    .onEnded{ _ in
                        scale -= 0.1
                })
    }
}
LongPressGesture
사용자가 지정한 시간 이상 view를 누르고 있는 경우를 인식합니다. 만약 1초 이상 누르면 이미지 크기가 반으로 줄어드는 이미지 뷰가 생성됩니다.
struct ContentView: View {
    @State private var scale: CGFloat = 1.0

    var body: some View {
        Image("seogun")

            .scaleEffect(scale)
            .gesture(
                LongPressGesture(minimumDuration: 1)
                    .onEnded { _ in
                        scale /= 2
                    }
            )
    }
}
onLongPressGusture을 활용해보도록 하겠습니다.
우선 아래와 같이 간단한 버튼 두 개와 마치 로딩되는 bar처럼 코드를 작성하겠습니다
import SwiftUI

struct LongPressGesture: View {
    @State var isCompleted: Bool = false
    var body: some View {

        VStack {
            Rectangle()
                .fill(Color.blue)
                .frame(height: 55)
                .frame(width: 10)
                .frame(maxWidth: .infinity, alignment: .leading)
                .background(Color.gray)

            HStack(spacing: 20) {
            Text("2초간 유지")
                .foregroundColor(.white)
                .padding()
                .background(Color.black.cornerRadius(10))
            Text("리셋")
                .foregroundColor(.white)
                .padding()
                .background(Color.black.cornerRadius(10))
            }
            .padding()
        }
     }
 }
그리고 @State 변수인 Bool타입 isCompleted를 생성 후에 fill의 Color, frame을 아래와 같이 수정해줍니다.
Rectangle()
                .fill(Color.blue)
                .frame(height: 55)
                .frame(width: 10)
                .frame(maxWidth: .infinity, alignment: .leading)
                .background(Color.gray)
다음으로는 .onLongPressGesture을 사용하여 간단한 조건문을 적용한 애니메이션을 만들어 주려고 합니다. 우선 적용해야 할 부분은 Text의 "2초간 유지"가 되겠네요.


기본적으로 이런 코드가 만들어지는데,
minimumDuration : 몇 초간 버튼을 Press 하고 있을지
maximumDistance : 누르고 있는 범위
라고 아시면 될 거 같습니다.
우선 @State 변수로 isSuccess를 만들어주고, fill에 isSuccess가 true이면 green색을 부여해줍니다.
또 진행 바 부분이 될 frame에 isCompleted아 true일 때와 false일 때의 상황에 맞게 width을 설정해주겠습니다.
그런 후에 Text부분에 .onLongPressedGesture수정자를 추가해주는데 만약 isPressed가 true이면 isCompleted를 false에서 true로 바뀌게 해 주고 withAnimation을 사용하면 됩니다. 하지만 여기서 중요한 점은 애니메이션에도 꼭 duration을 minimumDuration에서 설정한 값과 동일하게 해 줘야 정상적으로 실행이 됩니다.
다음으로는 perform부분에 isPressed가 정상적으로 true상태가 되었다면 isSuccess도 true상태를 부여해 앞에 설정해준 fill부분이 green이 되도록 해줍니다.
import SwiftUI

struct LongPressGesture: View {
    @State var isCompleted: Bool = false
    @State var isSuccess: Bool = false
    var body: some View {

        VStack {
            Rectangle()
                .fill(isSuccess ? Color.green : Color.blue)
                .frame(height: 55)
                .frame(width: isCompleted ? .infinity : 0)
                .frame(maxWidth: .infinity, alignment: .leading)
                .background(Color.gray)

            HStack(spacing: 20) {
                Text("2초간 유지")
                    .foregroundColor(.white)
                    .padding()
                    .background(Color.black.cornerRadius(10))
                    .onLongPressGesture(minimumDuration: 1.5, maximumDistance: 50) { (isPressed) in
                        if isPressed {
                            withAnimation(.easeIn(duration: 1.5)) {
                                isCompleted = true
                            }
                        }
                    } perform: {
                        isSuccess = true
                    }


                Text("리셋")
                    .foregroundColor(.white)
                    .padding()
                    .background(Color.black.cornerRadius(10))
            }
            .padding()
        }
한 가지 더 추가해주고 싶은 기능이 있습니다. 만약 2초간 누르지 않고 중간에 손을 떼 버리면 다시 isCompleted가 false로 바뀌게 해주고 싶습니다. else문을 활용해보죠.
.onLongPressGesture(minimumDuration: 1.5, maximumDistance: 50) { (isPressed) in
    if isPressed {
        withAnimation(.easeInOut(duration: 1.5)) {
            isCompleted = true
        }
    } else {
        if !isSuccess {
            withAnimation(.spring()) {
                isCompleted = false
            }
        }
    }
이렇게 실행을 해보면 손가락을 중간에 떼면 정상적으로 loading bar가 0으로 돌아갑니다. 하지만 2초간 유지했을 때는 갑자기 green색으로 변하면서 다시 0으로 돌아가는 것을 확인할 수 있는데, 이때는 지연 효과를 하나 추가해주면 해결 가능합니다.
지연 효과는 0.1초면 충분합니다.
 } else {
    DispatchQueue.main.asyncAfter(deadline: .now() + 0.1) {
        if !isSuccess {
            withAnimation(.spring()) {
                isCompleted = false
            }
        }
    }
 }
자 이제 마지막으로 리셋 버튼 구현만 해주면 됩니다. 이 코드는 아주 간단합니다. .onTapGesture수정자를 사용하겠습니다.
Text("리셋")
    .foregroundColor(.white)
    .padding()
    .background(Color.black.cornerRadius(10))
    .onTapGesture {
       withAnimation(.spring()) {
        isCompleted = false
        isSuccess = false
       }
    }
전체 코드
<hide/>
import SwiftUI

struct LongPressGesture: View {
    @State var isCompleted: Bool = false
    @State var isSuccess: Bool = false
    var body: some View {

        VStack {
            Rectangle()
                .fill(isSuccess ? Color.green : Color.blue)
                .frame(height: 55)
                .frame(width: isCompleted ? .infinity : 0)
                .frame(maxWidth: .infinity, alignment: .leading)
                .background(Color.gray)

            HStack(spacing: 20) {
                Text("2초간 유지")
                    .foregroundColor(.white)
                    .padding()
                    .background(Color.black.cornerRadius(10))
                    .onLongPressGesture(minimumDuration: 1.5, maximumDistance: 50) { (isPressed) in
                        if isPressed {
                            withAnimation(.easeInOut(duration: 1.5)) {
                                isCompleted = true
                            }
                        } else {
                            DispatchQueue.main.asyncAfter(deadline: .now() + 0.1) {
                                if !isSuccess {
                                    withAnimation(.spring()) {
                                        isCompleted = false
                                    }
                                }
                            }
                        }

                    } perform: {
                        withAnimation(.spring()) {
                            isSuccess = true
                        }
                    }


                Text("리셋")
                    .foregroundColor(.white)
                    .padding()
                    .background(Color.black.cornerRadius(10))
                    .onTapGesture {
                        withAnimation(.spring()) {
                            isCompleted = false
                            isSuccess = false
                        }
                    }
            }
            .padding()
        }
    }
}
DragGesture
DragGesture는 offset()뷰의 자연스러운 위치를 조정할 수 있는 수정 자 와 결합할 때 특히 좋습니다.예를 들어 다음 dragOffset은 드래그 동작에 연결된 크기를 사용하여 이미지를 오프셋 합니다.
이미지를 드래그한 뒤, 손을 떼면 원래 위치로 이동됩니다.
struct ContentView: View {
    @State private var dragOffset = CGSize.zero

    var body: some View {
        VStack {
            Image("seogun")
                .resizable()
                .scaledToFit()
                .offset(dragOffset)
                .gesture(
                    DragGesture()
                        .onChanged { gesture in
                            dragOffset = gesture.translation
                        }
                        .onEnded { gesture in
                            dragOffset = .zero
                        }
                )
        }
    }
}
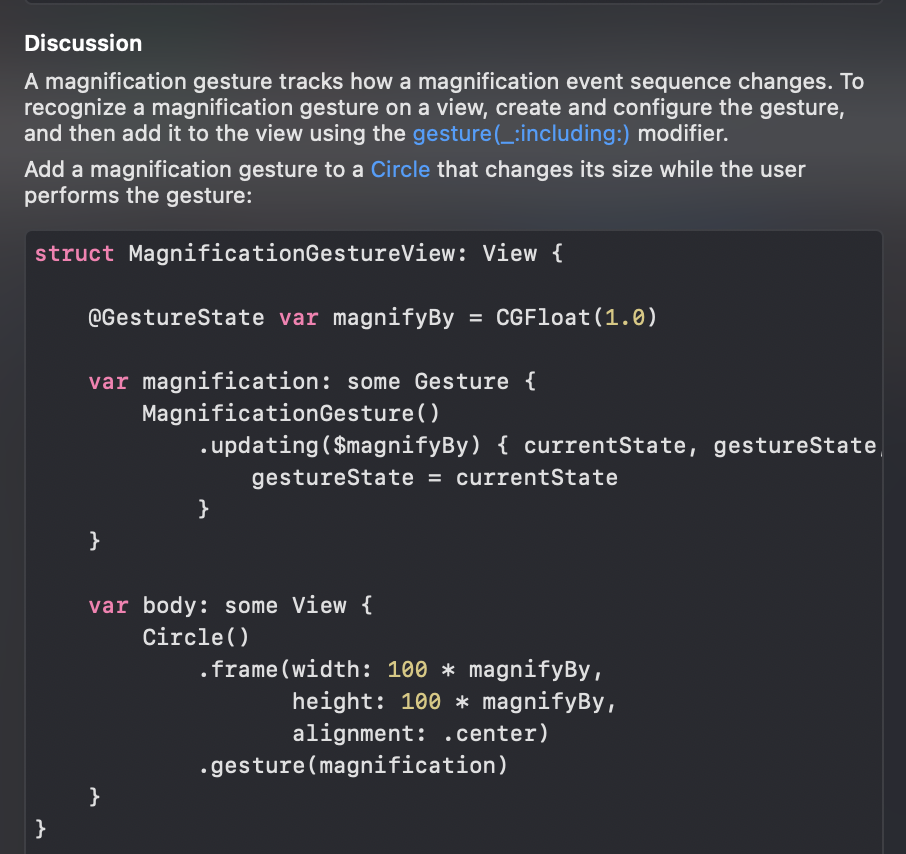
MagnificationGesture (화면 확대 / 축소)
기본적으로 사진 앱이나 인스타그램 페이스북에서 사진을 확대 축소하는 것처럼 기능을 추가해 줄 수 있습니다. 이 기능을 사용하기 위해서는 MagnificationGesture수정자를 사용해야 합니다.
우선 기본적인 텍스트를 하나 만들어서 기능을 구현해볼까 합니다.
import SwiftUI

struct SwiftUIView: View {
    var body: some View {
        Text("MagnificationGesture")
            .font(Font.title.bold())
            .foregroundColor(.white)
            .padding(50)
            .background(Color.blue.cornerRadius(20))
            .gesture(
                MagnificationGesture()
                    .onChanged { value in

                    }
            )
    }
}ManificationGeture에는 .onCahnged 옵션과 .onEnded옵션이 포함되어있습니다.
ManificationGeture를 뷰에 연결하여 줌인 및 줌아웃으로 뷰의 크기를 늘리거나 줄일 수 있습니다. 그러기 위해서는 @StatescaleAmount를 저장하는 두 개의 속성을 생성하고, scaleEffect()수정자 내부에 이것을 사용하여 다음과 같이 제스처에서 해당 값을 설정하여 수행할 수 있습니다.
struct MagnificationGestureViews: View {
    @State var currentAmount: CGFloat = 0
    @State var lastAmount: CGFloat = 1
    var body: some View {
        Text("MagnificationGesture")
            .font(Font.title.bold())
            .foregroundColor(.white)
            .padding(50)
            .background(Color.blue.cornerRadius(20))
            .scaleEffect(currentAmount + lastAmount)
            .gesture(
                MagnificationGesture()
                    .onChanged { value in
                        currentAmount = value - 1
                    }
            )
    }
}
시뮬레이터에서 줌인, 아웃을 사용하기 위해서는 옵션⌥ 을 누른 상태로 마우스를 당기면 확대 및 축소가 가능합니다. 이제 위 코드를 실행하여 확인해 보도록 하죠.
화면을 보면 정상적으로 확대가 되지만, 다시 축소를 할 때 자연스럽지 않게 화면이 툭 끊기를 것을 확인할 수 있습니다. 이를 해결하기 위해서는 .onEnded부분에 코드를 추가해줘야 합니다.
        Text("MagnificationGesture")
            .font(Font.title.bold())
            .foregroundColor(.white)
            .padding(50)
            .background(Color.blue.cornerRadius(20))
            .scaleEffect(currentAmount + lastAmount)
            .gesture(
                MagnificationGesture()
                    .onChanged { value in
                        currentAmount = value - 1
                    }
                    .onEnded { value in
                        lastAmount += currentAmount
                        currentAmount = 0
                    }
            )
이제 인스타그램처럼 사진을 확대하고, 손을 놓으면 제자리로 돌아올 수 있도록 만들어보겠습니다.
struct MagnificationGestureViews: View {
    @State var currentAmount: CGFloat = 0
    var body: some View {

        VStack {
            HStack {
                Circle().frame(width: 30, height: 30)
                Text("@Seogun")
                Spacer()
                Image(systemName: "ellipsis")
            }
            .padding()

            Image("sample1")
                .resizable()
                .scaledToFit()
                .scaleEffect(1 + currentAmount)
                .gesture(
                 MagnificationGesture()
                    .onChanged { value in
                        currentAmount = value - 1
                    }
                )

            HStack {
                Image(systemName: "heart")
                Image(systemName: "message")
                Image(systemName: "paperplane")
                Spacer()
                Image(systemName: "bookmark")
            }
            .padding()
        }
    }
}
시뮬레이터를 확인해보면 확대는 정상작동을 하지만 손을 놓았을 때 제자리로 돌아가지 않죠? 또, 좋아요/댓글 부분도 이미지 아래로 내려가지 않고 최상단에 위치해있어 많이 거슬리네요. onEended에 withAnimation을 사용하여 코드를 추가해주겠습니다.
            Image("sample1")
                .resizable()
                .scaledToFit()
                .scaleEffect(1 + currentAmount)
                .gesture(
                    MagnificationGesture()
                        .onChanged { value in
                            currentAmount = value - 1
                        }
                        .onEnded { value in
                            withAnimation(.spring()) {
                                currentAmount = 0
                            }
                        }
                )
                //이미지를 제일 위로 위치하도록 설정
                .zIndex(1.0)
읽어주셔서 감사합니다🤟
'SWIFTUI > Others' 카테고리의 다른 글
| SwiftUI : @FetchRequest 속성 래퍼 [Core Data #1] (1) | 2021.06.05 |
|---|---|
| SwiftUI : Mask (3) | 2021.05.30 |
| SwiftUI : Markups과 Documentation을 추가하는 방법 (0) | 2021.05.13 |
| SwiftUI : ActionSheet (0) | 2021.05.12 |
| SwiftUI : Sheet & FullScreenCover & Transition & Animation 비교 (0) | 2021.05.11 |


 한국어 (기본)
 English
 Русский
 日本語
日本語
