목차
SwiftUI에서 가장 기본이 되는 Text에 대해 알아보도록 합시다.
Text
        VStack(spacing: 20) {
            Text("서근개발블로그")
            Text(Image(systemName: "star.fill"))
            Text(Date(), style: .time)
        }
Text view는 현재 플랫폼에 적합한 본문 글꼴을 사용하여 앱의 사용자 인터페이스에 문자열을 그려줍니다.
font(_:) view modifier를 사용하여 제목이나 캡션과 같은 다른 표준 글꼴을 선택할 수 있습니다.
Text의 스타일을 조금 더 세밀하게 조정해야 하는 경우 같은 modifier 를 사용하여 글꼴을 구성하거나, 커스텀 폰트를 선택할 수 있습니다.
Text("서근의 블로그")
   .font(.system(size: 12, weight: .light, design: .serif))
   .italic()
Frame
frame을 사용하여 Text의 공간을 정하고 줄 바꿈, 크기 조정 등을 통해 적합하게 화면을 구성할 수 있습니다.
Text("To be, or not to be, that is the question:")
    .frame(width: 100)
multilineTextAlignment
.lineLimit()를 사용하면 줄 수의 제한을 정할 수 있고, 해당 공간을 넘어가면 나머지의 Text는 잘립니다.
관련된 코드 : lineLimit(_:) allowsTightening(_:) minimumScaleFactor(_:) truncationMode(_:)
Text("Brevity is the soul of wit.")
    .frame(width: 100)
    .lineLimit(3) //3줄까지만 제한을 둔다. ()안에 nil을 쓰면 무제한
    .multilineTextAlignment(.center) //여러줄의 텍스트 표시 정렬방식
    .lineSpacing(50) //텍스트 줄간격 조절
.truncationMode 를 사용하면 원하는 위치의 Text를 생략할 수 있습니다.
자를 부분은 .head / .middle / .tail 로 정 할 수 있습니다.
        Text("lineLimit를 사용하면 줄수의 제한을 정할 수 있고, 해당 공간을 넘어가면 나머지의 Text는 잘립니다.")
            .padding()
            .lineLimit(1)
            .truncationMode(.head / .middle / .tail )
        //글자가 너무 길어 짤릴때, 앞을짜르냐, 중간을짜르냐, 뒤를짜르냐를 결정하는 코드.
allowsTightening
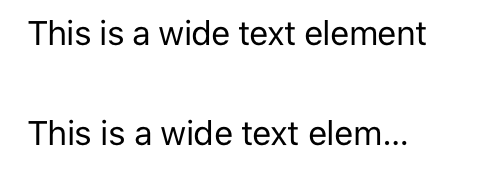
Text를 한 줄에 맞추기 위해 필요한 경우 이view의 Text가 문자 사이의 공간을 압축할 수 있는지 여부를 설정합니다.
func allowsTightening(_ flag: Bool) -> some ViewVStack {
Text("This is a wide text element")
.font(.body)
.frame(width: 200, height: 50, alignment: .leading)
.lineLimit(1)
.allowsTightening(true) //압축을 한다.
Text("This is a wide text element")
.font(.body)
.frame(width: 200, height: 50, alignment: .leading)
.lineLimit(1)
.allowsTightening(false) //압축을 하지 않는다.
}
Choosing a Font & Styling the View’s Text
Text("hello world")
.font(._) //Swift에 정해져있는 글꼴사이즈를 사용할 수 있다.
.font(.system(size: Int))  //사용자 글꼴 사이즈
.fontWeight(.bold)  //폰트의 두께

Text("hello world")
.italic()        //필기체
.underline()     //밑줄
.strikethrough() //취소선
Text("hello world")
.tracking(10) //자간설정 *텍스트 바로밑에 작성 해야 함.
.fontWeight(.black) //폰트 굵기
.foregroundColor(.원하는색) //글씨색
.background(Color.원하는색) //배경색
.shadow(color. Color.black, radius: 2, x:1, y:1)
// (color: .primary, radius: ...) 그림자
.blur(radius: n) //텍스트 흐림 효과를 줌
텍스트 사이에 간격 추가 및 커스텀 폰트
우선 .kerning부터 사용해보겠습니다.
        VStack(alignment: .leading) {
            Text("ABCDEF").kerning(-3)
            Text("ABCDEF")
            Text("ABCDEF").kerning(3)
        }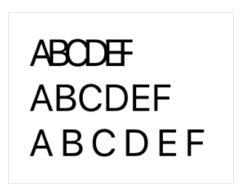
위 코드에서 .kerning을 빼고 .tracking 을 넣어보도록 하겠습니다.
        VStack(alignment: .leading) {
            Text("ABCDEF").tracking(-3)
            Text("ABCDEF")
            Text("ABCDEF").tracking(3)
        }
결과가 같습니다. 그렇다면 이 둘의 차이점이 무엇일까요? 차이점을 알아보기 위해서는 합자가 있는 즉, Text가 겹쳐지는 문자열일 때 차이점이 분명해집니다. Slider
struct ContentView: View {
    @State private var amount: CGFloat = 50

    var body: some View {
        VStack {
            Text("ffi")
                .font(.title)
                .kerning(amount)
            Text("ffi")
                .font(.title)
                .tracking(amount)

            Slider(value: $amount, in: 0...100) {

            }
        }
    }
}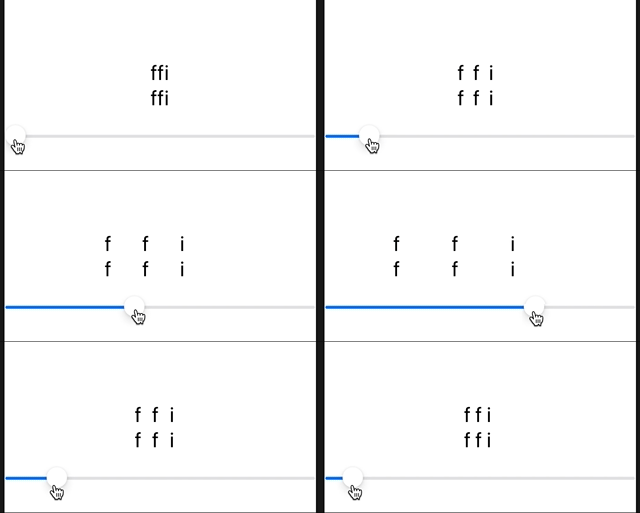
두 Text에 차이점이 하나도 없죠? 그렇다면 합자가 있는 폰트로 변경해보겠습니다.
커스텀 폰트를 적용하는 코드는 아래와 같습니다.
Text("커스텀 폰트")
    .font(.custom("someFont", size: ))
struct ContentView: View {
    @State private var amount: CGFloat = 50

    var body: some View {
        VStack {
            Text("ffi")
                .font(.custom("AmericanTypewriter", size: 60))
                .kerning(amount)
            Text("ffi")
                .font(.custom("AmericanTypewriter", size: 60))
                .tracking(amount)

            Slider(value: $amount, in: 0...100) {

            }
        }
    }
}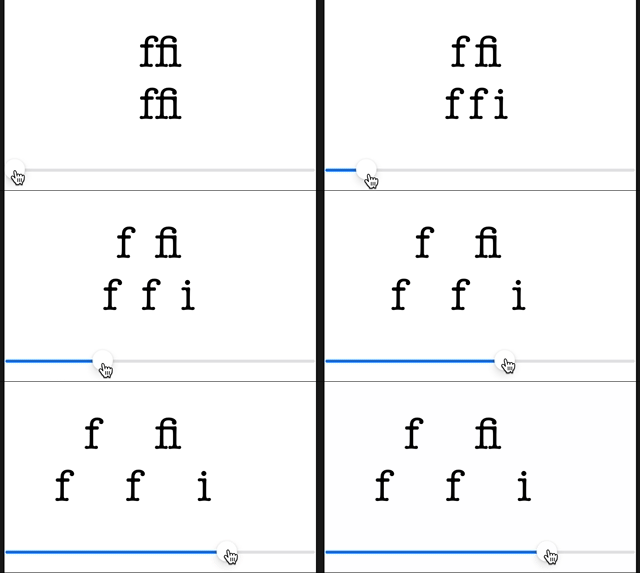
.tracking은 합자를 분리 시키고, .kerning은 합자를 분리시키지 않습니다.
2개 이상의 텍스트를 하나로 묶어서 동시에 적용
Text("자간과 기준선").kerning(8) //자간
            + Text(" 조정도 쉽게 가능합니다")
        .font(.system(size: 16))
        .baselineOffset(50)
lineSpacing 텍스트 줄 간격
.lineSpacing() 으로 Text의 줄 간격을 조절 해 줄 수 있습니다.
        Text("lineSpacing을 사용하여 텍스트의 줄 간격을 조절 해 줄 수도 있습니다.")
            .font(.title)
            .lineSpacing(40)
            .frame(width: 300)

    }
Padding
패딩은 Text 또는 이미지 등 주변에 여백을 주는 modifier 입니다.
Text("패딩")
.padding(Int) //all
.padding(.leading, 30) //왼쪽
.padding(.trailing, 30) //오른쪽
.padding(.top, 30) //위
.padding(.bottom, 30) //아래
//한줄로 패딩 주는 방법
.padding(EdgeInsets(top: 0, leading: 0, bottom: 0, trailing: 0))
날짜 형식을 지정
SwiftUI의 Text 뷰에는 화면에서 날짜를 더보기 좋게 만드는 두 가지 date formatters 가 있습니다.
하나는 단일 날짜를 처리하고, 다른 하나는 날짜 범위를 처리합니다.
date formatter를 한국어로 만들어 주기 위해 작성해줘야 하는 것이 있습니다.
 static let dateformat: DateFormatter = {
       let formatter = DateFormatter()
        formatter.dateFormat = "YYYY년 M월 d일"
        return formatter
    }()
이렇게 dateformat을 만들어주고, 이제 Text로 출력을 해줘야 하는데 오늘의 날짜를 우선 생성해줘야 합니다.
var today = Date()var body: some View {
Text("오늘의 날짜입니다 : \(today)")
}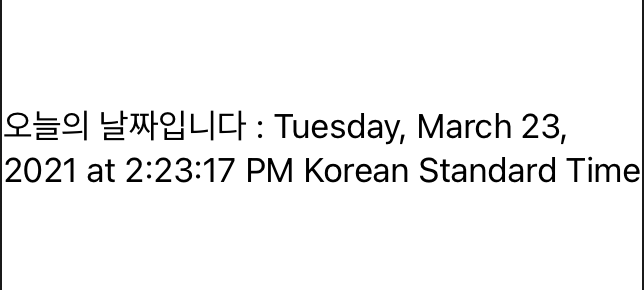
저렇게 today 를 불러오면 위 사진처럼 전체 날짜 및 위치가 뜨게 되는데, 이것을 우리가 만들어준 dateFormatter를 사용해요 원하는 텍스가 출력될 수 있도록 만들어 줘야 합니다.
Text("오늘의 날짜입니다 : \(today, formatter: ContentView.dateFormat)")
formatter를 작성할 때 "YYYY년 M월 d일" 의 'd일'을 대문자 'D'로 쓰면 날짜 오류가 납니다.
그렇기 때문에 반드시 소문자 'd일' 로 작성해야 합니다.
또 예를 들어 '현재시간 - 10분후 (9:30pm - 9:40pm)' 을 Text 형식으로 추가할 수 있습니다.
  //600초 = 10분
Text(Date()...Date().addingTimeInterval(600))

단일 날짜로 작업할 때 날짜 style 형식 지정 방법을 결정하기 위해서 매개 변수를 제공해야 합니다.
- style: .date
- style: .time
- style: .relative
- style: .timer
Text(Date().addingTimeInterval(600), style: .date)
Text(Date().addingTimeInterval(600), style: .time)
Text(Date().addingTimeInterval(600), style: .relative)
Text(Date().addingTimeInterval(600), style: .timer)


문자열보간을 사용하여 아래와 같이 작성할 수 있습니다. \( )
Text("현재 날짜 : \(Date().addingTimeInterval(600), style: .date)")
소수점 n 자리 뒤 삭제 방법
//소수점 2번재 짜리까지 표시
String(format: "%.2f", somecode)
텍스트 폰트 디자인
Text Font의 디자인을 수정해줄 수 있지만, 아직은 영어만 적용되는 듯합니다.
rounded
Text("ToDo List")
  .font(.system(size: 40, weight: .black, design: .rounded))
monospaced
Text("ToDo List")
  .font(.system(size: 40, weight: .black, design: .monospaced))
serif
Text("ToDo List")
  .font(.system(size: 40, weight: .black, design: .serif))
텍스트 사용 예제
import SwiftUI

struct ContentView: View {
    var body: some View {

        //여러개의 텍스트를 넣고 싶을땐, VStack 또는 HStack을 넣는다.
        VStack(alignment:.center) { //밑에 다른것들도 함께 정렬하고싶을때 / alignment
            //HStack은 수평, VStack은 수직 정렬이다.


                Image("russia") //사진이름
                .resizable() //크기조정
                .aspectRatio(contentMode: .fit) //종횡비
                .cornerRadius(50) //코너반경
                .padding(.all)
                //.clipShape(Circle()) //클립모양

            Text("Hello, SwiftUI!")
                .font(.largeTitle)
                .foregroundColor(.green)


            Text("Second line")
                .font(.title)
                .foregroundColor(.yellow)

            Text("Hello")
                .font(.title)
                .fontWeight(.blod)
                .padding()
                .background(Color.purple)
                .cornerRadius(40)
                .foregroundColor(.white)
                .padding(10)
                .overlay(
                    RoundedRectangle(cornerRadius: 40)
                        .stroke(Color.purple, lineWidth: 5))

            HStack {
                Text("Left Side")
                    .padding()  //주변이 커짐
                    .background(Color.purple)
                    .foregroundColor(.white)

                Text("Right Side")
                    .fontWeight(.bold)
                    .font(.title)
                    .padding()
                    .background(Color.green)
                    .foregroundColor(.white)
                    .padding(10)
                    .border(Color.green, width: 5) //width:두께, border:경계


            }


        }

    }
}

struct ContentView_Previews: PreviewProvider {
    static var previews: some View {
        ContentView()
    }
}
읽어주셔서 감사합니다🤟
'SWIFTUI > Controls' 카테고리의 다른 글
| SwiftUI : TextField (hideKeyboard 코드) (0) | 2021.05.12 |
|---|---|
| SwiftUI : Dynamic List and identifiable (0) | 2021.05.04 |
| SwiftUI : Toggle Switch (toggleStyle) (0) | 2021.03.18 |
| SwiftUI : Alert (알림 메세지) (0) | 2021.01.23 |
| SwiftUI : EditButton [onDelete, OnMove] (1) | 2021.01.23 |


 한국어 (기본)
 English
 Русский
 日本語
日本語
