Dynamic List
이번에는 List를 사용하여 Dynamic List View를 만들어 보도록 하겠습니다.
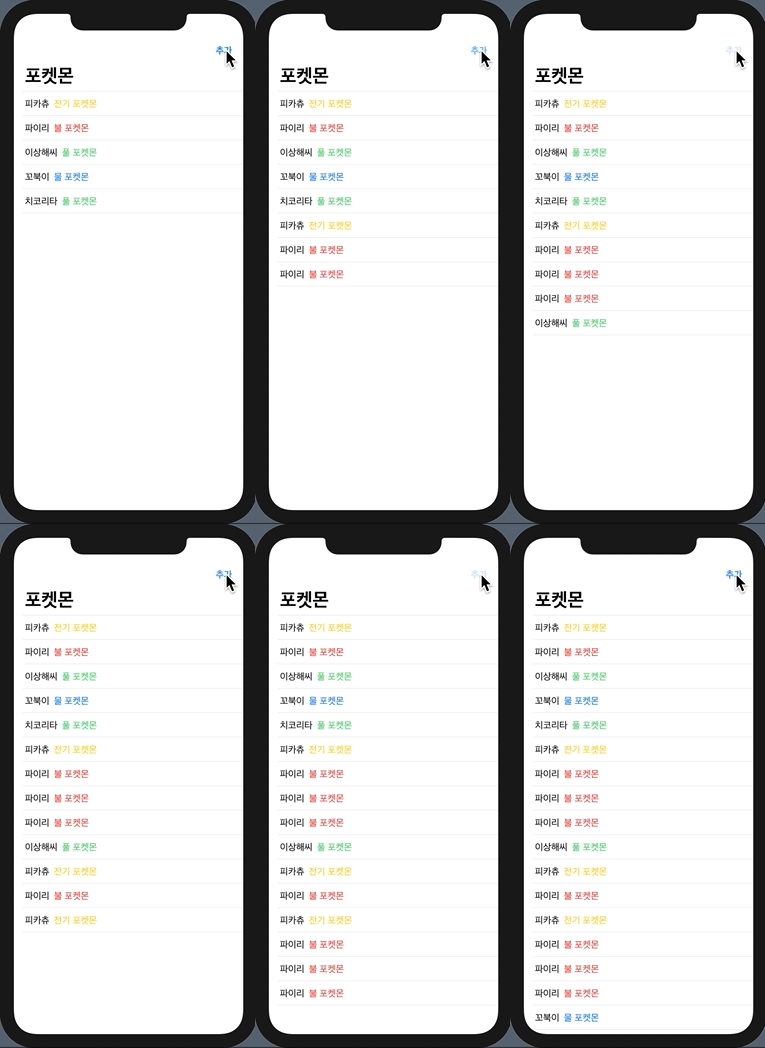
위처럼 포켓몬의 이름에 따른 타입과 그에 맞는 컬러를 매치시키시고 오른쪽 상단에 있는 navigationBarItems을 누를 때마다 랜덤 하게 포켓몬의 이름이 생성되도록 하는 것이 목표입니다.
우선 간단하게 아래와 같이 작성해보도록 하겠습니다. 우선 pokemon의 모델을 struct로 하나 만들어 주겠습니다.
struct pokemonModel {
    let name: String
    let type: String
    let color: Color
    let imagename: String
}
그리고 @State변수로 name과 type그리고 color를 배열시켜 주도록 합니다.
struct Pokemon: View {
    @State var pokemonList = [
        pokemonModel(name: "피카츄", type: "전기 포켓몬", color: .yellow, imagename: "bolt.fill"),
        pokemonModel(name: "파이리", type: "불 포켓몬", color: .red, imagename: "flame.fill"),
        pokemonModel(name: "이상해씨", type: "풀 포켓몬", color: .green, imagename: "leaf.fill"),
        pokemonModel(name: "꼬북이", type: "물 포켓몬", color: .blue, imagename: "tortoise.fill")
    ]
    var body: some View {

    }
}
이제 pokemonList를 body안에서 호출해주려면 List를 사용해야 합니다.
var body: some View {
    List(pokemonList, id: \.name) { pokemon in
        HStack {
            Image(systemName: pokemon.imagename)
                .frame(width: 30)
                .foregroundColor(pokemon.color)
                .padding(.trailing, 10)
            Text(pokemon.name)
            Spacer()
            Text(pokemon.type).foregroundColor(pokemon.color)


        }
    }
}
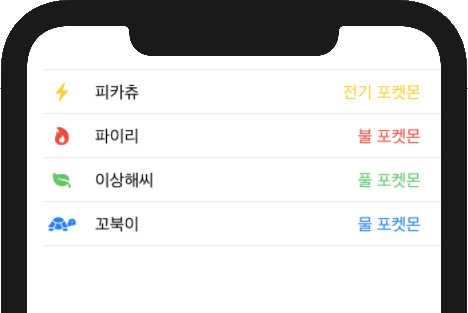
이렇게 화면을 구성했습니다.
Identifiable
우리는PokemonModel에 직접 identifiable프로토콜을 사용하지 않고 List에서 id: \.name으로 이름을 통해 식별되게 했으며 각각은 고유 식별자를 가지게 됐습니다. 하지만 한 가지 큰 문제가 있습니다. 만약 pokemonList에서 "파이리"를 "피카츄"로 바꾸면 어떻게 될까요?
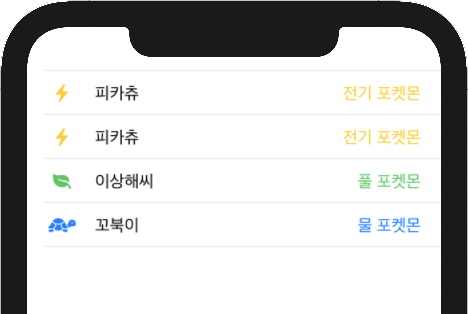
Xcode는 이렇게 인식합니다.
"그래, 피카츄는 전기 타입이야!"
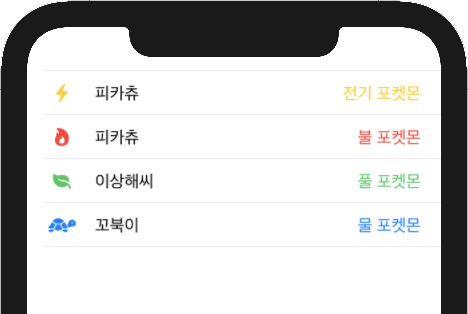
하지만 우리는 두 번째 항목에서 피카추는 불 타입이라고 정해줬었죠. SwiftUI에서 자동으로 피카추를 전기 타입으로 입력한 이유는 우리가 id를 name식별자로 넣어줬기 때문입니다. 이것을 방지하려면 identifiable과 함께 id변수를 추가해줘야 합니다.
struct pokemonModel: Identifiable {
    let id: Int
    let name: String
    let type: String
    let color: Color
    let imagename: String
}
그리고 pokemonList부분도 수정해줘야 합니다.
struct Pokemon: View {
    @State var pokemonList = [
        pokemonModel(id: 0, name: "피카츄", type: "전기 포켓몬", color: .yellow, imagename: "bolt.fill"),
        pokemonModel(id: 1, name: "피카츄", type: "불 포켓몬", color: .red, imagename: "flame.fill"),
        pokemonModel(id: 2, name: "이상해씨", type: "풀 포켓몬", color: .green, imagename: "leaf.fill"),
        pokemonModel(id: 3, name: "꼬북이", type: "물 포켓몬", color: .blue, imagename: "tortoise.fill")
    ]
이렇게 각각에 고유한 id가 생성되었고, List의 id: \.name을 지워주고 프리뷰를 실행 주겠습니다. 프리뷰를 실행해보면 아래와 같이 피카추는 불 포켓몬이라고 나오게 됩니다.
NavigationView 및 Button 추가
List를 NavigationView로 감싸고 NavigationBarItems을 사용하여 버튼을 클릭하면 랜덤으로 포켓몬 리스트가 추가되도록 구현해보겠습니다.
var body: some View {
    NavigationView {
        List(pokemonList) { pokemon in
            HStack {
                Image(systemName: pokemon.imagename)
                    .frame(width: 30)
                    .foregroundColor(pokemon.color)
                    .padding(.trailing, 10)
                Text(pokemon.name)
                Spacer()
                Text(pokemon.type).foregroundColor(pokemon.color)
            }
        }
        .navigationBarTitle("포켓몬")
        .navigationBarItems(trailing:
                                Button("추가") {
                                    //some action
                                }
        )
    }
}
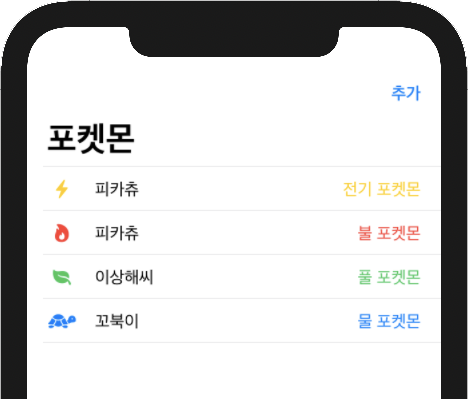
이렇게 NavigationView / NavigationBarTitle / NavigationBarItems 까지 성공적으로 구현했습니다. 하지만 한 가지 걸리는 것이 있습니다. 아래 이미지를 보면 NavigationBarItems을 사용한 것과 NavigationBarItems주석처리 한 화면이 다른 것을 확인할 수 있습니다.
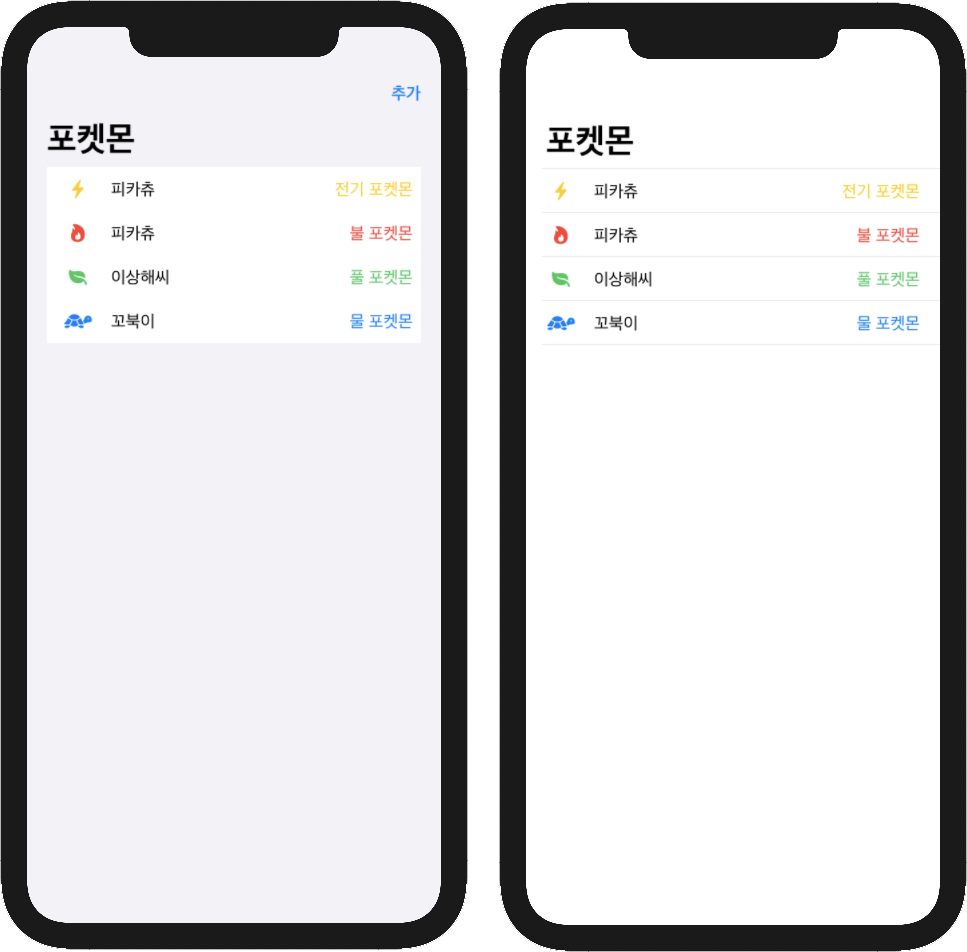
이것을 방지하려면 listStyle을 PlainListStyle로 설정해주면 됩니다. .listStyle(PlainListStyle())
var body: some View {
    NavigationView {
        List(pokemonList) { pokemon in
            ...
        }
        .listStyle(PlainListStyle())
        .navigationBarTitle("포켓몬")
        .navigationBarItems(trailing:
                                Button("추가") {
                                    //some action
                                }
        )
    }
}
Button Action 추가
이제 버튼에 action을 만들어 주겠습니다. func에 addPokemon()이라고 함수를 만들고 lf let을 사용하여 랜덤으로 아이템이 추가되도록 하겠습니다.
func addPokemon() {
    if let randomPokemon = pokemonList.randomElement() {
        pokemonList.append(randomPokemon)
    }
}
그리고 버튼의 action에서 함수를 호출해줍니다.
Button("추가") {
  addPokemon()
}
한 가지 문제가 있습니다. 저희는 model에 id부여해줬는데 저런 식으로 추가를 해주면 오류가 생기게 됩니다. 그렇기 때문에 리스트가 추가될 때마다 새로운 Id를 부여해주도록 해줘야 합니다.
if let -> if var로 바꿔주고 model쪽은 let id: Int -> var id: Int
func addPokemon() {
    if var randomPokemon = pokemonList.randomElement() {
        let newid = pokemonList.count
        randomPokemon.id = newid
        pokemonList.append(randomPokemon)
    }
}
전체 코드
import SwiftUI

struct pokemonModel: Identifiable {
    var id: Int
    let name: String
    let type: String
    let color: Color
    let imagename: String
}

struct Pokemon: View {
    @State var pokemonList = [
        pokemonModel(id: 0, name: "피카츄", type: "전기 포켓몬", color: .yellow, imagename: "bolt.fill"),
        pokemonModel(id: 1, name: "피카츄", type: "불 포켓몬", color: .red, imagename: "flame.fill"),
        pokemonModel(id: 2, name: "이상해씨", type: "풀 포켓몬", color: .green, imagename: "leaf.fill"),
        pokemonModel(id: 3, name: "꼬북이", type: "물 포켓몬", color: .blue, imagename: "tortoise.fill")
    ]
    var body: some View {
        NavigationView {
            List(pokemonList) { pokemon in
                HStack {
                    Image(systemName: pokemon.imagename)
                        .frame(width: 30)
                        .foregroundColor(pokemon.color)
                        .padding(.trailing, 10)
                    Text(pokemon.name)
                    Spacer()
                    Text(pokemon.type).foregroundColor(pokemon.color)
                }
            }
            .listStyle(PlainListStyle())
            .navigationBarTitle("포켓몬")
            .navigationBarItems(trailing:
                                    Button("추가") {
                                        addPokemon()
                                    }
            )
        }
    }
    func addPokemon() {
        if var randomPokemon = pokemonList.randomElement() {
            let newid = pokemonList.count
            randomPokemon.id = newid
            pokemonList.append(randomPokemon)
        }
    }
}

struct Pokemon_Previews: PreviewProvider {
    static var previews: some View {
        Pokemon()
    }
}
읽어주셔서 감사합니다🤟
본 게시글의 전체 코드 GitHub 👇🏻
Seogun95/SwiftUI_Pokemon
SwiftUI Dynamic List. Contribute to Seogun95/SwiftUI_Pokemon development by creating an account on GitHub.
github.com
'SWIFTUI > Controls' 카테고리의 다른 글
| SwiftUI : TextField (hideKeyboard 코드) (0) | 2021.05.12 |
|---|---|
| SwiftUI : Text (0) | 2021.04.29 |
| SwiftUI : Toggle Switch (toggleStyle) (0) | 2021.03.18 |
| SwiftUI : Alert (알림 메세지) (0) | 2021.01.23 |
| SwiftUI : EditButton [onDelete, OnMove] (1) | 2021.01.23 |


 한국어 (기본)
 English
 Русский
 日本語
日本語
