

 SEOGUN
haptics vibration 에 대해 알아보도록 합시다.
이번에는 저번 sound effects처럼 싱글톤을 사용하여 앱에 특정 버튼을 누르면 햅틱 반응을 추가해보려고 합니다. 참고로 이것의 실제로 사용해보려면 시뮬레이터나 캔버스가 아닌 실제 기기가 필요합니다.
바로 시작해보도록 하죠!
Haptics Vibration
우선 HapticsManager이라는 클래스를 생성하고 싱글톤을 생성해줍니다.
class HapticManager {

    static let instance = HapticManager()

}
그리고 두 개의 함수를 추가해줄건데 첫 번째는 notification 함수, 두 번째는 impact 함수입니다. 이렇게 나눠져 있는 이유는 내장된 햅틱 기능이 실제로 이렇게 분리되어있기 때문입니다.
class HapticManager {

    static let instance = HapticManager()

    func notification() {

    }

    func impact() {

    }

}
notification 함수
notification함수를 먼저 코드를 추가해주겠습니다.
let generator = UINotificationFeedbackGenerator()을 사용하겠습니다.
그리고 이 generator.notificationOccurred을 입력하고 엔터를 눌러줍니다.

   func notification() {

        let generator = UINotificationFeedbackGenerator()
        generator.notificationOccurred(UINotificationFeedbackGenerator.FeedbackType)
    }
이제 우리는 괄호 안에 있는 UINotificationFeedbackGenerator.FeedbackType를 잘라서 notification의 함수에 전달해줄 것입니다.


impact 함수
두 번째로 Impact함수에 코드를 넣어주겠습니다.
이번에도 let generator라는 변수를 생성하고 UIImpactFeedbackGenerator을 가져오겠습니다.
UIImpactFeedbackGenerator에 괄호를 열어보면 style유형이 있습니다. 요것을 사용하죠!

마찬가지로 style의 UIImpactFeedbackGenerator.FeedbackStyle도 Impact함수에 전달해줍니다.
func impact(style: UIImpactFeedbackGenerator.FeedbackStyle) {
        let generator = UIImpactFeedbackGenerator(style: style)
    }
그리고 generator을 호출해야겠죠? generator.impactOccurred()를 아래 추가해줍니다.
    func impact(style: UIImpactFeedbackGenerator.FeedbackStyle) {
        let generator = UIImpactFeedbackGenerator(style: style)
        generator.impactOccurred()
    }
Body에 호출
class HapticManager {

    static let instance = HapticManager()

    func notification(type: UINotificationFeedbackGenerator.FeedbackType) {

        let generator = UINotificationFeedbackGenerator()
        generator.notificationOccurred(type)
    }

    func impact(style: UIImpactFeedbackGenerator.FeedbackStyle) {
        let generator = UIImpactFeedbackGenerator(style: style)
        generator.impactOccurred()
    }
}
자 일단은 notification과 impact함수를 모두 생성했고, 이제 이 두 가지 스타일의 진동을 직접 뷰에 넣어보고 비교해보도록 하겠습니다.
Button의 action에 생성한 싱글톤을 사용하여 각각의 옵션을 쉽게 확인할 수 있습니다.

우선 notification옵션부터 확인해볼까요? HapticManager.instance.notification(type: )를 입력하고 type부분에 점(.)을 입력해보면 아래 옵션을 확인할 수 있습니다.

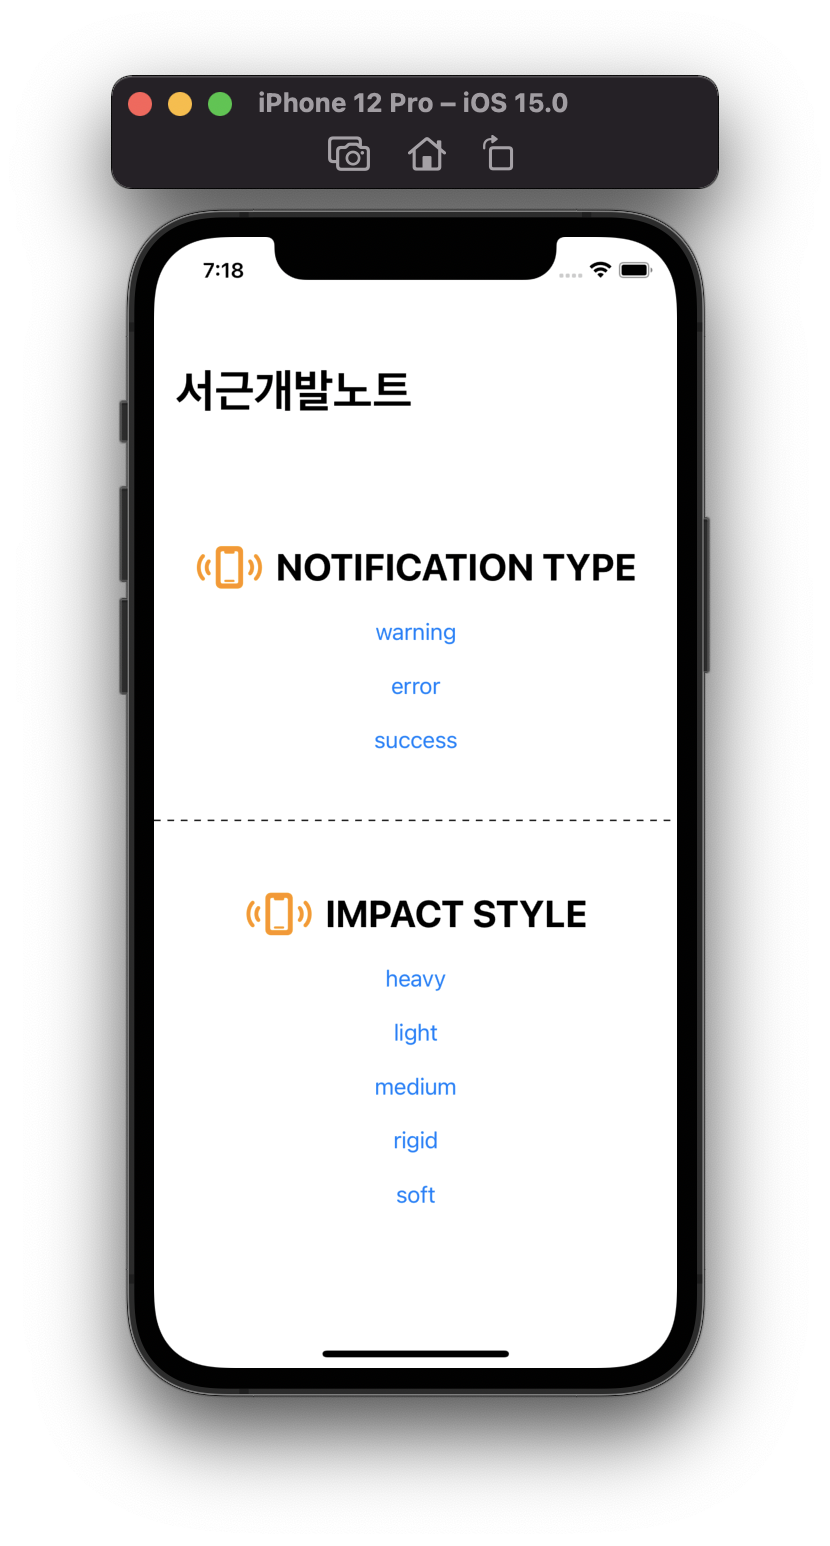
notification의 옵션은 warning, error, success로 세 가지 네요.
                Button("warning") { HapticManager.instance.notification(type: .warning) }
                Button("error") { HapticManager.instance.notification(type: .error) }
Button("success") { HapticManager.instance.notification(type: .success) }impact는 heavy, light, medium, rigid, soft 총 다섯 가지 군요!

                Button("heavy") { HapticManager.instance.impact(style: .heavy) }
                Button("light") { HapticManager.instance.impact(style: .light) }
                Button("medium") { HapticManager.instance.impact(style: .medium) }
                Button("rigid") { HapticManager.instance.impact(style: .rigid) }
                Button("soft") { HapticManager.instance.impact(style: .soft) }
저는 이런 식으로 뷰를 구성해줬습니다.
struct HapticsView: View {
    var body: some View {
        NavigationView {
            VStack(spacing: 20) {
                HStack {
                    Image(systemName: "iphone.radiowaves.left.and.right").foregroundColor(.orange)
                    Text("Notification type".uppercased())
                }
                .font(.title.bold())
                Button("warning") { HapticManager.instance.notification(type: .warning) }
                Button("error") { HapticManager.instance.notification(type: .error) }
                Button("success") { HapticManager.instance.notification(type: .success) }

                //구분선
                Line().stroke(style: StrokeStyle(lineWidth: 1, dash: [5])).frame(height: 2)
                    .padding(.vertical, 30)

                Group { //stack이 10개가 넘어가기 때문에 group 적용
                    HStack {
                        Image(systemName: "iphone.radiowaves.left.and.right").foregroundColor(.orange)
                        Text("impact style".uppercased())
                    }
                        .font(.title.bold())
                    Button("heavy") { HapticManager.instance.impact(style: .heavy) }
                    Button("light") { HapticManager.instance.impact(style: .light) }
                    Button("medium") { HapticManager.instance.impact(style: .medium) }
                    Button("rigid") { HapticManager.instance.impact(style: .rigid) }
                    Button("soft") { HapticManager.instance.impact(style: .soft) }
                }
            }
            .navigationBarTitle("서근개발노트")
        }
    }
}

//구분선 Shape
struct Line: Shape {
    func path(in rect: CGRect) -> Path {
        var path = Path()
        path.move(to: CGPoint(x: 0, y: 0))
        path.addLine(to: CGPoint(x: rect.width, y: 0))
        return path
    }
}
실행
이제 시뮬레이터가 아닌 실기 기를 사용하여 앱을 실행하고 직접 진동을 비교해가며 실제 앱에 적용시킬 수 있습니다.
전체 코드
<hide/>

import SwiftUI


class HapticManager {

    static let instance = HapticManager() //싱글톤

    func notification(type: UINotificationFeedbackGenerator.FeedbackType) {

        let generator = UINotificationFeedbackGenerator()
        generator.notificationOccurred(type)
    }

    func impact(style: UIImpactFeedbackGenerator.FeedbackStyle) {
        let generator = UIImpactFeedbackGenerator(style: style)
        generator.impactOccurred()
    }
}

struct ContentView: View {
    var body: some View {
        NavigationView {
            VStack(spacing: 20) {
                HStack {
                    Image(systemName: "iphone.radiowaves.left.and.right").foregroundColor(.orange)
                    Text("Notification type".uppercased())
                }
                .font(.title.bold())
                Button("warning") { HapticManager.instance.notification(type: .warning) }
                Button("error") { HapticManager.instance.notification(type: .error) }
                Button("success") { HapticManager.instance.notification(type: .success) }

                //구분선
                Line().stroke(style: StrokeStyle(lineWidth: 1, dash: [5])).frame(height: 2)
                    .padding(.vertical, 30)

                Group { //stack이 10개가 넘어가기 때문에 group 적용
                    HStack {
                        Image(systemName: "iphone.radiowaves.left.and.right").foregroundColor(.orange)
                        Text("impact style".uppercased())
                    }
                        .font(.title.bold())
                    Button("heavy") { HapticManager.instance.impact(style: .heavy) }
                    Button("light") { HapticManager.instance.impact(style: .light) }
                    Button("medium") { HapticManager.instance.impact(style: .medium) }
                    Button("rigid") { HapticManager.instance.impact(style: .rigid) }
                    Button("soft") { HapticManager.instance.impact(style: .soft) }
                }
            }
            .navigationBarTitle("서근개발노트")
        }
    }
}

//구분선 Shape
struct Line: Shape {
    func path(in rect: CGRect) -> Path {
        var path = Path()
        path.move(to: CGPoint(x: 0, y: 0))
        path.addLine(to: CGPoint(x: rect.width, y: 0))
        return path
    }
}

struct ContentView_Previews: PreviewProvider {
    static var previews: some View {
        ContentView()
    }
}
읽어주셔서 감사합니다🤟
본 게시글의 전체 코드 GitHub 👇🏻
Seogun95/HapticsView
SwiftUI_HapticsView. Contribute to Seogun95/HapticsView development by creating an account on GitHub.
github.com
'SWIFTUI > Others' 카테고리의 다른 글
| SwiftUI : 가로 회전 기능 끄는 방법 (0) | 2022.02.23 |
|---|---|
| SwiftUI : App Icon (0) | 2022.01.04 |
| SwiftUI : Sound Effects _ AVKit (0) | 2021.06.27 |
| SwiftUI : Combine과 함께 JSON 다운로드하기 (2) | 2021.06.22 |
| SwiftUI : @escaping과 함께 JSON Data 다운로드하기 (0) | 2021.06.18 |


 한국어 (기본)
 English
 Русский
 日本語
日本語
